When I first started to use Mac OS X, Finder's Spotlight was quite a simple piece of technology - search your system for what you need when you need it. I used to also very much dislike the iOS Spotlight until iOS 7 which made it easy to use and now I use it to run any app on my iPhone or iPad.
I got very used to the idea of using Spotlight for starting apps and now I do it to open anything on my system because it's just so fast. There's even a shortcut that will let you open it and type in what you need in a flash (which is ⌘ + SPACE).
But there is so much more to Spotlight now.
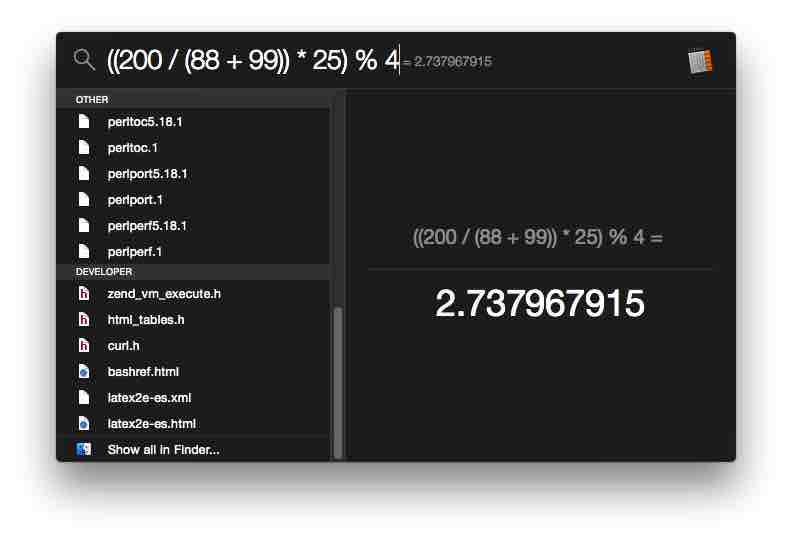
Here I've demonstrated my favourite use - a calculator:

Using it as a calculator means you can write out the expression very quickly and it supports a range of different mathematical features including the following keywords:
- sin, cos, tan, sqrt
- ^ - power
- % - modulo
- Brackets
This is just a few of the useful calculator operations you can do from your Spotlight search on your Mac.
Since I got my Mac mini in November I've been having problems with my Logitech G500 being very 'laggy'. I don't know if this is down to the fact that it is across 5m worth of USB powered hubs and so on or if it is a problem with OS X. It does work fine when I plug it straight in to the USB 3.0 port on the back of the mini but even when it is across the hubs it works fine on Windows 7.
So I found a fabulous solution called Smooth Mouse. If you experience lag on your mouse you can download it here:
On Mac OS X, you have many different ways to take screenshots:
- Command + Shift + 3 - takes a fullscreen screen shot of the system and saves it to the Desktop
- Command + Shift + 4 - takes a screen shot of an area that you select using the selection rectangle that appears after then stores it on the Desktop
- Command + Shift + 4 then SPACE - takes a screen shot of a selected window on the display and stores it on the Desktop
- Command + Ctrl + Shift + 3 - takes a fullscreen screen shot and stores it on the clipboard
- Command + Ctrl + Shift + 4 - takes a screen shot of an area that you select using the selection rectangle that appears after then stores it on the clipboard
- Command + Ctrl + Shift + 4 then SPACE - takes a screen shot of a selected window on the display and stores it on the clipboard
I use the second one the most, because I find it more useful to have a copy of the screen shot on my system. But the problem is, I end up with too many images on my desktop.
I'd really like to fix this by making the screen shots go to my Pictures/Screenshots/ directory. So a bit of looking around the web and I found the solution using Bash:
To start with open up a new Terminal window. This can be found in Applications/Utilities/Terminal.app.
Write/copy the following on a single line:
defaults write com.apple.screencapture location ~/Pictures/; killall SystemUIServer
And you are done!
If you are not familiar with Mac OS X Terminal commands, then you may be unaware of the flexibility it gives you.
For a start, one of my favourite things to do is to change the way the Dock works. I'm going to show you two different yet really cool things you can do with the Mac Dock.
Add a separator to the Dock
This is a real nifty trick that helps separate icons on the Dock so that there is a better structure. I'm still surprised that Apple does not include an easy way to use this feature in the Apple Menu.
So here are the Terminal commands:
defaults write com.apple.dock persistent-apps -array-add '{tile-data={}; tile-type="spacer-tile";}'
killall Dock
Lock the Dock
To me locking the Dock on Mac OS is a necessary feature. This again is completed via the Terminal. This can be achieved using the following commands:
defaults write com.apple.Dock contents-immutable -bool yes
killall Dock


