
The demo on the right will be affected whenever the code is run on any of the samples following it.

Animation
As well as the fadeIn and fadeOut methods jQuery offers for
animation of fading an element in or out, jQuery supports custom animations
with properties that are to be manipulated. For this course, the following
features of the animate method will be used:
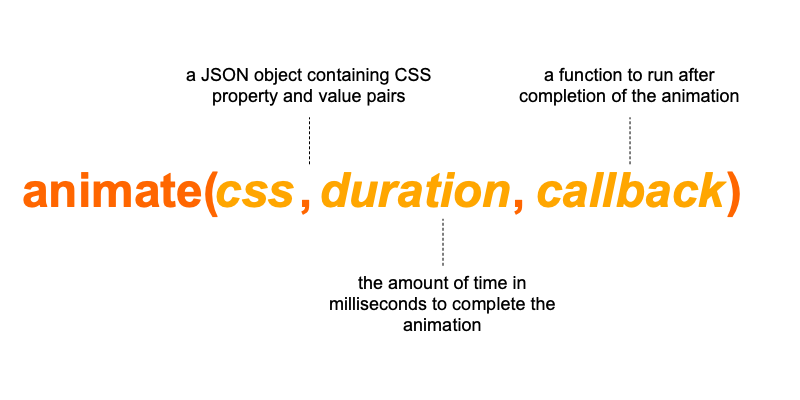
- The CSS to be manipulated
- The duration of the animation
- The callback function when the animation is complete
There are several more features (or parameters) that can be manipulated
to make the animate method even more powerful.
Animations in jQuery have entirely optional parameters, meaning you do not need
to use the duration and callback parameters at all. Furthermore,
jQuery uses type inference to determine the type of the second parameter, so if a
numeric duration was not provided, it would then check to see if the parameter of the
method data type to determine if the second parameter is in fact a callback method.
In this example, the fadeOut method will be rewritten using the
animate method:
jQuery("#main_image_display").animate({"opacity" : 0}, 1000, function(){jQuery("#main_image_display").hide()});
It is also very common to manipulate the positioning of an element within a page using
jQuery. For example, the top property can be easily changed by jQuery:
jQuery("#main_image_display").animate({"top" : "-50px"}, 3000);
Simple animations
The following are examples of simple animations you can carry out using jQuery. Remember, jQuery animations, as powerful as they are, cannot manipulate every single property available to CSS.
margin-left
This example simply changes the margin-left property to
-50px.
jQuery("#main_image_display").animate({"margin-left" : "-50px"});
margin-right
This example simply increases the margin-right property of the element by 10px
each time it is run. This is done using the code +=10px
jQuery("#main_image_display").animate({"margin-right" : "+=10px"});
border-radius
This example sets the border-radius property to a
much smaller 3px value.
jQuery("#main_image_display").animate({"border-radius" : "3px"});
Multiple properties at once
jQuery doesn't just have to animate one property at a time. You can change the
border-radius and the margin-right
at the same time.
This is achieved by including commas in between each of the different property-to-value pairs:
jQuery("#main_image_display").animate({"margin-right" : "100px", "border-radius" : "3px"});
You can definitely tidy up the code if you want to apply to multiple different properties by taking a new line in between each of them:
jQuery("#main_image_display").animate({
  "margin-right" : "100px",
  "border-radius" : "3px"
});
This is very common practice.
Timed animations
Animations can be given a specific time (as shown in the first two animations) to complete. This is known as the duration of the animation.
This example simply increases the width and
height properties of the element by 100px.
jQuery("#main_image_display").animate({
  "width" : "+=100px",
  "height" : "+=100px"
});
This same animation can be adapted by adding a duration. In this case the duration is "slow":
jQuery("#main_image_display").animate({
  "width" : "+=100px",
  "height" : "+=100px"
}, "slow");
Now with a duration of "fast":
jQuery("#main_image_display").animate({
  "width" : "+=100px",
  "height" : "+=100px"
}, "fast");
A duration can also be specified in milliseconds:
jQuery("#main_image_display").animate({
  "width" : "+=100px",
  "height" : "+=100px"
}, 10000);
This example is running an animation of 10 seconds.
Callbacks
A callback function is simply a function (Function B) that is passed to another function call (Function A) so that when Function A completes some kind of routine or action Function B is also immediately called and executed.
jQuery("#main_image_display").animate({
  "opacity" : 0,
  "width" : 0,
  "height" : 0
  }, function(){
    jQuery("#main_image_display").hide();
    alert("Done");
  }
);
In the example above, an anonymous function (more information is available in the JavaScript tutorial here)
is used to run some arbitrary code such as, in the case shown above, hiding the image completely and alerting
the user that it is done once the opacity,
width and height properties reach 0.
The code show previously is starting to look a bit messy, and it can get worse. By using white space like above the readability of the code will improve.
Combining it all
Of course as mentioned previously it's possible to combine the animation properties with a duration and a callback to provide more features.
In the previous examples, both the duration of the animation and the callback have been
the second argument in the animate method. This works because of type inference
in which a program or piece of code decides what the type of the parameter is to decide
what to do with it before executing it. When a duration and a callback are required, the duration
must come first:
jQuery("#main_image_display").animate({
  "opacity" : 0,
  "width" : 0,
  "height" : 0
}, 10000, function(){
    jQuery("#main_image_display").hide();
    alert("Done");
  }
);
Note 10000 on line 5 in this example is the duration property.
Stopping an animation
If an animation is already being carried out on an element and another animation is to be carried out on it, jQuery will not stop the previous animation but will continue to run it and add the animation to the animation queue for that element.
If an interactive website includes some feature that requires immediate action, such as a button press, that needs to be immediate. That button could animate an element which if not carried out immediately would be detrimental to the website. Assuming two buttons are created, Button 1 and Button 2:
//Button 1 code
jQuery("#main_image_display").animate({
  "width" : "300px",
  "height" : "300px"
}, 10000);
//Button 2 code
jQuery("#main_image_display").animate({
  "width" : "150px",
  "height" : "150px"
}, 10000);
Pressing on the 'Make big' button should immediately start the animation to make the image big and the 'Make small' should immediately start the animation to make the image small. But they don't.
This is because jQuery is currently animating this element and it will finish that animation
first. This can be solved with jQuery's stop method:
//Button 1 code
jQuery("#main_image_display").stop().animate({
  "width" : "300px",
  "height" : "300px"
}, 10000);
//Button 2 code
jQuery("#main_image_display").stop().animate({
  "width" : "150px",
  "height" : "150px"
}, 10000);
By applying the stop() method in the chain before applying the animation,
jQuery will stop existing animations being carried out on the element before
applying a new one. This is a very powerful and useful feature of jQuery animations.